OpenVNet Installation Guide
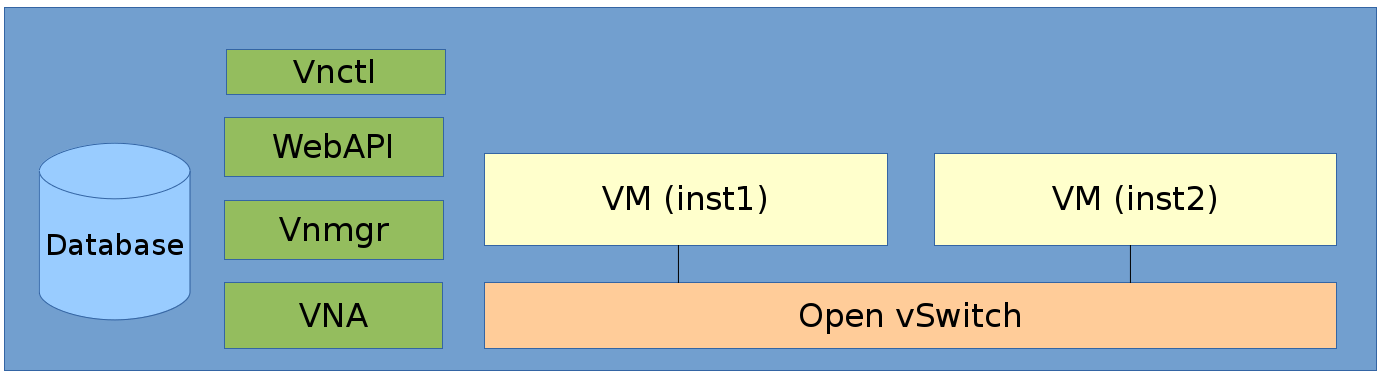
Overview
Welcome to the world of OpenVNet! With this installation guide we help you create a very simple yet innovative virtual network environment.
In this guide we are going to install all of OpenVNet's services into a single machine running CentOS. This can be a virtual machine. Afterwards we are going to use LXC to set up two containers that we'll connect to OpenVNet's virtual networks.
Requirements
- CentOS 6
- Internet connection
Installation
Install OpenVNet Packages
Download the openvnet.repo file and put it to your /etc/yum.repos.d/ directory.
curl -o /etc/yum.repos.d/openvnet.repo -R https://raw.githubusercontent.com/axsh/openvnet/master/deployment/yum_repositories/stable/openvnet.repo
Download the openvnet-third-party.repo file and put it in your /etc/yum.repos.d/ directory.
curl -o /etc/yum.repos.d/openvnet-third-party.repo -R https://raw.githubusercontent.com/axsh/openvnet/master/deployment/yum_repositories/stable/openvnet-third-party.repo
Each repo has the following packages:
openvnet.repo
- openvnet (metapackage)
- openvnet-common
- openvnet-vna
- openvnet-vnmgr
- openvnet-webapi
- openvnet-vnctl
openvnet-third-party.repo
- openvnet-ruby
- openvswitch
Install epel-release.
yum install -y epel-release
Install OpenVNet packages.
yum install -y openvnet
openvnet is an metapackage that depends on openvnet-common, openvnet-vna, openvnet-vnmgr, openvnet-webapi and openvnet-vnctl. It's just a convenient way to install all of those at once.
Install Redis and MySQL server. Redis is required for OpenVNet's processes to communicate and MySQL is used to store the network state.
Though they're both required, they are not package dependencies because OpenVNet is distributed software. In a production environment, it is very likely for these packages to be installed on other machines than the OpenVNet processes themselves.
yum install -y mysql-server redis
Setup Open vSwitch
We are going to create a bridge br0 using Open vSwitch. Later we will attach our VMs inst1 and inst2 to this bridge.
Create the file /etc/sysconfig/network-scripts/ifcfg-br0 with the following contents.
DEVICE=br0
DEVICETYPE=ovs
TYPE=OVSBridge
ONBOOT=yes
BOOTPROTO=static
HOTPLUG=no
OVS_EXTRA="
 set bridge     ${DEVICE} protocols=OpenFlow10,OpenFlow12,OpenFlow13 --
 set bridge     ${DEVICE} other_config:disable-in-band=true --
 set bridge     ${DEVICE} other-config:datapath-id=0000aaaaaaaaaaaa --
 set bridge     ${DEVICE} other-config:hwaddr=02:01:00:00:00:01 --
 set-fail-mode  ${DEVICE} secure --
 set-controller ${DEVICE} tcp:127.0.0.1:6633
"
Remark: Notice how we set the datapath-id to 0000aaaaaaaaaaaa? This is a unique ID that OpenVNet will use to recognise this bridge later. You can set it to any 16 hex digits of your choosing but make sure to remember it for later.
Start the openvswitch service and bring up the bridge.
service openvswitch start
ifup br0
Setup Database
Launch the MySQL server.
service mysqld start
OpenVNet uses its own ruby binary. We need to add it to the PATH variable so we can call bundle in the next step.
PATH=/opt/axsh/openvnet/ruby/bin:${PATH}
Create database
cd /opt/axsh/openvnet/vnet
bundle exec rake db:create
bundle exec rake db:init
Start redis
As mentioned above, OpenVNet services require redis to communicate with each other. Start it.
service redis start
Start OpenVNet services
Starting the OpenVNet services will create log files in the /var/log/openvnet directory. If anything goes wrong, you might find useful error messages in them.
Start vnmgr and webapi.
initctl start vnet-vnmgr
initctl start vnet-webapi
We use vnctl to create the database records subsequent to the above configurations. vnctl is a Web API client offered by the openvnet-vnctl package.
Datapath
Remember the datapath-id we set when setting up Open vSwitch? The following command will tell OpenVNet that VNA needs to manage this datapath.
vnctl datapaths add --uuid dp-test1 --display-name test1 --dpid 0x0000aaaaaaaaaaaa --node-id vna
Mac Address Range
In order for the network overlay to work, OpenVNet uses mac addresses independently of any real or virtual interface. To allocate these it requires the creation of a default mac range group.
vnctl mac_range_groups add --uuid mrg-dpg
In common.conf, the mac range group is set by default to mrg-dpg and can be changed using the datapath_mac_group option.
vnctl mac_range_groups mac_ranges add mrg-dpg --begin_mac_address 52:56:01:00:00:00 --end_mac_address 52:56:01:ff:ff:ff
-
begin_mac_address : The lowest possible mac address value in the range.
-
end_mac_address : The highest possible mac address value in the range.
Now let's start vna.
initctl start vnet-vna
You can run ovs-vsctl show to check if vna is working correctly.
You should be able to see is_connected: true in its output. If it doesn't appear right away, wait a few seconds and then try again. If it still doesn't appear, something went wrong and you should have a look at /var/log/openvnet/vna.log for errors.
fbe23184-7f14-46cb-857b-3abf6153a6d6
    Bridge "br0"
        Controller "tcp:127.0.0.1:6633"
            is_connected: true
LXC Setup
We now have OpenVNet set up and working but we don't have any virtual machines connected to it yet. In this step we are going to use LXC to create the two containers (guests) inst1 and inst2 that will be connected to OpenVNet's virtual networks.
Any virtualization techonology will work but in this guide we're using LXC because it's lightweight and can easily be set up inside virtual machines as well.
Install LXC
yum -y install lxc lxc-templates
Create and mount cgroup
mkdir /cgroup
echo "cgroup /cgroup cgroup defaults 0 0" >> /etc/fstab
mount /cgroup
Create 2 LXC guests
Rsync is required for this. If it's not installed already, install it with the following command.
yum install -y rsync
lxc-create -t centos -n inst1
lxc-create -t centos -n inst2
These commands' output will tell you were to find or set the root password for inst1 and inst2. Make sure set it and remember it for later. You're going to need it to log into them.
Apply Network interface settings
Open the file /var/lib/lxc/inst1/config and replace its contents with the following.
lxc.network.type = veth
lxc.network.flags = up
lxc.network.veth.pair = inst1
lxc.network.hwaddr = 10:54:FF:00:00:01
lxc.rootfs = /var/lib/lxc/inst1/rootfs
lxc.include = /usr/share/lxc/config/centos.common.conf
lxc.arch = x86_64
lxc.utsname = inst1
lxc.autodev = 0
Open the file /var/lib/lxc/inst2/config and replace its contents with the following.
lxc.network.type = veth
lxc.network.flags = up
lxc.network.veth.pair = inst2
lxc.network.hwaddr = 10:54:FF:00:00:02
lxc.rootfs = /var/lib/lxc/inst2/rootfs
lxc.include = /usr/share/lxc/config/centos.common.conf
lxc.arch = x86_64
lxc.utsname = inst2
lxc.autodev = 0
Remark: We do not use lxc.network.link parameter because the Linux bridge is replaced by the Open vSwitch. That parameter expects to interface with the Linux bridge and containers will fail to start if you attempt to use it with Open vSwitch. We'll enslave the tap interfaces manually in the next step.
Start the LXC guests
lxc-start -d -n inst1
lxc-start -d -n inst2
Attach them to Open vSwitch
ovs-vsctl add-port br0 inst1
ovs-vsctl add-port br0 inst2
Now the LXC's network interfaces are attached to the Open vSwitch. This is basically the same as plugging a network cable into a physical switch.
Congratulations. You have now installed OpenVNet and you're ready to start building your first virtual network. We recommend you start with the simplest possible setting: Single Network.