Single network
Overview
This is the simplest possible setup after completing the installation guide. It's a great start for when you're just getting into OpenVNet.
This document expects you to have set up OpenVNet according to the installation guide. We will be referring to the VMs inst1 and inst2 as they've been set up in there.
We are going to use them to create the following virtual network topology.
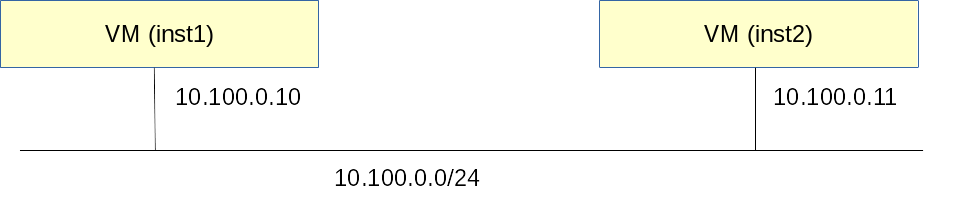
We will just have one simple network: 10.100.0.0/24.
Inst1's IP address:10.100.0.10Inst2's IP address:10.100.0.11
Setup
Create the network
vnctl networks add \
  --uuid nw-test1 \
  --display-name testnet1 \
  --ipv4-network 10.100.0.0 \
  --ipv4-prefix 24 \
  --network-mode virtual
Set up the interfaces
Now that we have a virtual network, we need to tell OpenVNet which interfaces are in it and which IP addresses they will get. We need to do this for both inst1 and inst2.
vnctl interfaces add \
  --uuid if-inst1 \
  --mode vif \
  --owner-datapath-uuid dp-test1 \
  --mac-address 10:54:ff:00:00:01 \
  --network-uuid nw-test1 \
  --ipv4-address 10.100.0.10 \
  --port-name inst1

vnctl interfaces add \
  --uuid if-inst2 \
  --mode vif \
  --owner-datapath-uuid dp-test1 \
  --mac-address 10:54:ff:00:00:02 \
  --network-uuid nw-test1 \
  --ipv4-address 10.100.0.11 \
  --port-name inst2
For more information about the interfaces commands, visit their section in the Vnctl documentation.
Test
Log into inst1 and check its IP address configuration.
lxc-console -n inst1
ip a
If everything went well you will see that it has no IP address assigned to it. That is to be expected. The network we have just set up does not have a DHCP server. Assign the IP address manually.
ip addr add 10.100.0.10/24 dev eth0
Now open another terminal and do the same for inst2.
lxc-console -n inst2
ip addr add 10.100.0.11/24 dev eth0
Now that both have their IP address set up, you can try having them ping each other. Since we just logged into inst2, let's ping inst1 from there.
ping 10.100.0.10
If everything went well, ping should now be working. If not, review all the steps to make sure you didn't make any mistakes.
Remark
Now that we've set up this virtual network and tested it, it's a good time to tell you about a difference between traditional networks and OpenVNet's virtual networks.
Let's see what happens when we change inst2's IP address to 10.100.0.15/24
ip addr del 10.100.0.11/24 dev eth0
ip addr add 10.100.0.15/24 dev eth0
Now try pinging inst1 again.
ping 10.100.0.10
What do you see? Ping no longer works.
On a tradition network, changing the IP address to anywhere within 10.100.0.0/24 would work but OpenVNet is more strict. We have registered inst2 in OpenVNet's database with IP address 10.100.0.11 and OpenVNet will not allow it to use anything else.
What's next?
You've now successfully set up the simplest possible OpenVNet configuration. How about we make this virtual network a little more interesting by adding a DHCP service?