Two virtual networks
Overview
This document expects you to have set up OpenVNet according to the installation guide, created the simple single network and set up its DHCP server. We will be continuing from there so complete those guides first.
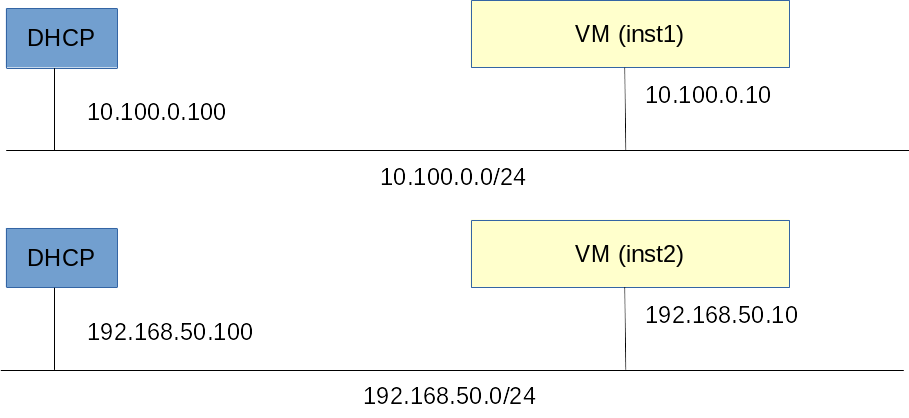
In this guide we will set up a second virtual network and move inst2
to it. We'll also set up a new DHCP server for that network. That will
give us the following topology.
Setup
The first two steps are similar to what we have done before. Create a new network and setup its simulated DHCP service.
Create the new network
vnctl networks add \
  --uuid nw-test2 \
  --display-name testnet2 \
  --ipv4-network 192.168.50.0 \
  --ipv4-prefix 24 \
  --network-mode virtual
Set up its DHCP server
vnctl interfaces add \
  --uuid if-dhcp2 \
  --mode simulated \
  --owner-datapath-uuid dp-test1 \
  --mac-address 02:00:00:00:01:12 \
  --network-uuid nw-test2 \
  --ipv4-address 192.168.50.100


vnctl network-services add \
  --uuid ns-dhcp2 \
  --interface-uuid if-dhcp2 \
  --type dhcp
Move inst2 to the new network
There are two ways to do this.
-
The quick and dirty way. Remove the interface and re-create it.
-
The clean but slightly harder way. Dig a little deeper into OpenVNet's inner workings make only the required changes.
Choose one of the two two ways below.
The quick and dirty way.
To keep things simple, we will just remove inst2 from OpenVNet's
database and re-create it.
A side effect of this method is that we will not be able to use the same UUID. That's because OpenVNet's database uses logical delete. Deleted records aren't actually removed but only marked as deleted. Their unique fields cannot be reused.
vnctl interfaces del if-inst2
Now re-create it. Since we can't reuse the UUID if-inst2, we'll use
if-newinst2.
vnctl interfaces add \
  --uuid if-newinst2 \
  --mode vif \
  --owner-datapath-uuid dp-test1 \
  --mac-address 10:54:ff:00:00:02 \
  --network-uuid nw-test2 \
  --ipv4-address 192.168.50.10 \
  --port-name inst2
You're done. Move on to the test section.
The clean but slightly harder way
We've now created several network interfaces in OpenVNet using the
vnctl interfaces add command. Actually every
time we call that command, OpenVNet creates several fields in the
database to keep track of MAC address, IP address, network assignment
etc. The field we need to change here is ip lease.
First have a look at inst2's interface.
vnctl interfaces show if-inst2
As you can see, there's quite a bit of information to be had here. The
part we're interested in is ip lease and more specifically, the ip lease UUID.
Look for it in the output.
---
:id: 2
:uuid: if-inst2
:mode: vif
...
:mac_leases:
- :id: 2
  :uuid: ml-sa4dusgn
  :interface_id: 2
  ...
  :ip_leases:
  - &1
    :id: 2
    :uuid: il-36cl1ou4 # <== This is what we're looking for.
    :interface_id: 2
    ...
In this example it's il-36cl1ou4 but it will be something else on
your environment. These UUIDs are randomly generated by OpenVNet when
a new resource is created.
Now run the following two commands, deleting the old ip lease and
creating a new one on the new network. Replace il-36cl1ou4 with the
correct ip lease UUID for your environment.
vnctl ip-leases del il-36cl1ou4
vnctl ip-leases add --interface-uuid if-inst2 --network-uuid nw-test2 --ipv4-address 192.168.50.10
That's it. The inst2 interface has now moved to the new network we created.
Test
Log into inst2 and have it perform a new DHCP request.
lxc-console -n inst2
service network restart
If everything went well, inst2 should now have received IP address
192.168.50.10. Now try pinging inst1.
ping 10.100.0.10
If you did things right, ping should have now told you that inst1's
network is unreachable. That's exactly right. Our LXC guests are now
in two different networks and have no route to each other.
What's next?
Now that we have two different networks, let's try using a simulated router to connect them together.